Vada Pav Recipe: 7 Easy Steps for Crispy Street-Style Flavor
Vada pav is more than just food. If you’ve walked the streets of Mumbai, you already know it’s a feeling. Cheap, filling, spicy, a bit messy—and totally addictive. It’s what you grab after work, during lunch breaks, or when you’re just craving something hot and satisfying without spending too much.
The good news? You don’t have to be in Mumbai to eat great vada pav. You can make it right in your kitchen. And yeah, it’s easier than you might think.
I’ve made vada pav plenty of times. Some turned out amazing. Others… not so much. The trick is getting the potato filling just right, nailing the chutneys, and not messing up the batter. Once you’ve got that figured out, it’s actually super doable.
Let’s get into it. Here’s how to make vada pav at home in just 7 simple steps.
Step 1: Prepare the Potato Filling
This is the heart of your vada pav. If this part’s bland, everything else falls flat.
What you need:
-
4 medium-sized potatoes (boiled and mashed)
-
2 green chilies (finely chopped)
-
1 tsp ginger-garlic paste
-
½ tsp turmeric
-
Salt to taste
-
A pinch of asafoetida (hing)
-
½ tsp mustard seeds
-
A few curry leaves
-
A little oil for tempering
-
Chopped coriander
-
A squeeze of lemon
How to do it:
Heat a pan, add oil, mustard seeds, and let them pop. Toss in asafoetida, curry leaves, green chilies, and ginger-garlic paste. Sauté for a minute, then add turmeric and salt. Add the mashed potatoes and mix everything together. Finish with chopped coriander and lemon juice.
Let it cool. Then shape into small balls—these will become your vadas.
Step 2: Make the Besan Batter
This batter is what gives vada pav its signature crunch.
You’ll need:
-
¾ cup besan (gram flour)
-
1 tbsp rice flour (for crispiness)
-
A pinch of turmeric
-
A pinch of red chili powder
-
Salt to taste
-
A pinch of baking soda (right before frying)
-
Enough water to make a thick batter
Tip: Batter should coat a spoon but still drop off slowly. Not too runny, not too thick. If it’s too watery, it won’t stick. Too thick, and your vada ends up with a heavy coating.
Step 3: Fry the Vadas
Heat oil in a deep pan. To test if the oil is ready, drop a bit of batter—it should sizzle and float.
Take each potato ball, dip it fully into the batter, and gently drop it into the oil. Fry a few at a time, but don’t overcrowd the pan. Let them turn golden and crisp.
Remove and place on a kitchen towel or wire rack.
By now, your kitchen should smell like a roadside food stall. That’s a good sign.
Step 4: Make the Chutneys
Vada pav without chutneys is just… incomplete. You need both a green chutney and a dry garlic chutney for that real street-style flavor.
Green Chutney:
-
Coriander leaves
-
Mint (optional)
-
Green chilies
-
Garlic
-
Lemon juice
-
Salt
Blend everything with a splash of water until smooth.
Dry Garlic Chutney:
-
Roasted garlic cloves
-
Roasted desiccated coconut
-
Red chili powder
-
Roasted peanuts
-
Salt
Grind this into a coarse powder. No water needed here.
Both chutneys can be made ahead and stored in the fridge for a few days.
Step 5: Toast the Pav
Take your pav buns and slice them horizontally, but not all the way through.
Optional but worth it: lightly toast the inside with butter on a pan. Makes a big difference. Adds a bit of crunch and warmth that ties everything together.
Step 6: Fry Green Chilies (Optional, But Awesome)
This step is for the brave. And if you want authentic vada pav, don’t skip it.
Slit whole green chilies, fry them quickly in hot oil until they blister, and sprinkle with salt. They’re spicy, but they balance the vada perfectly.
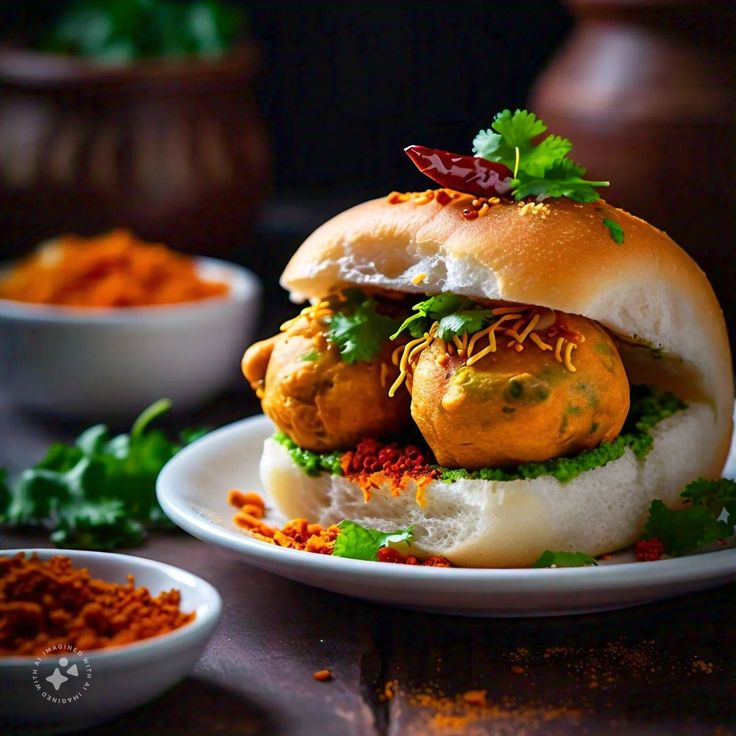
Step 7: Assemble Your Vada Pav
Here’s the fun part.
-
Open the pav.
-
Spread some green chutney on one side.
-
Sprinkle the dry garlic chutney on top.
-
Place a hot vada in the middle.
-
Close the bun, press it gently.
Serve with a fried green chili on the side.
Eat immediately. Like, now. The hotter, the better.
Extra Tips for Better Vada Pav
-
Rice flour in the batter makes it crispier. Always add a little.
-
Cool the potato mixture before shaping into balls. Hot mixture makes the batter slide off.
-
Use soft pav, not burger buns if you can help it. The texture matters.
-
If your vada is absorbing too much oil, your oil isn’t hot enough.
Variations to Try (If You Want to Mix It Up)
-
Stuff the vada with a small piece of cheese before frying. It melts inside. Unreal.
-
Add tamarind chutney if you like a sweet-spicy combo.
-
Use multigrain pav if you want to pretend it’s healthier.
Why I Love Making Vada Pav at Home
Look, I’m not a chef. I mess things up sometimes. But vada pav is one of those dishes that’s forgiving. Even when it’s not perfect, it still hits the spot.
I’ve made it for friends, family, even a few coworkers once during a get-together. The reaction? Always the same: “Wait, you made this?”
And every time, I’m reminded how something so simple—just potatoes, flour, chutney, and bread—can be so comforting.
It’s not about fancy plating or high-end ingredients. It’s about bold flavors, texture, and that hit of spice that makes you reach for a sip of chai.
Wrapping It Up
So, that’s it. Seven steps. A few ingredients. No fancy gadgets.
This vada pav recipe brings street food to your kitchen. And once you try it, I guarantee it’ll go into your regular rotation. Especially on weekends when you’re craving something hot, filling, and satisfying.
Give it a shot. And don’t worry if it’s not perfect the first time. Even a slightly messed-up vada pav still tastes better than half the snacks out there.